Friday, November 6, 2015

The room code of an art teacher

I have a room code.  I've had a room code since I started my final student teaching internship and I've kept it everywhere I've gone.  Even during the two times when I shared my room, I kept to my code, and let those around me know about it. The code: To never horde supplies in amounts where my room is nothing but piles.

During my my last internship, I was placed at a high school for one semester and the teacher had two large connected classrooms giving him about 2,000 square feet easy.  It was difficult to adjust to the room, because it was poorly laid out.  There were unorganized supplies in random closets, brand new supplies mixed with old, rarely if ever used supplies, there were speed bumps that interrupted traffic flow, and the storage of student work was often difficult.  I would often go in for several hours on the weekend to finish grading and to just sit and imagine how I would change the room to make it more efficient and conducive to making art.  This process of focusing on foot traffic, grouping supplies, and re-imagining storage gave me the skills I needed to be a successful art teacher.  I believe that the reason I've been successful has been because I have worked hard to lay a solid foundation with my room space.  Having a room space that is well-grounded has helped me eliminate problems with transitions, material distribution, clean up, and student interaction.  My room space is the first step I take when I come up with routines such as clean up or lining up too.  Your room dictates the type of environment and energy your students will be making art in as well as how your routines will flow.

Panoramic view of my new room mostly setup.
Now, I am a firm believer in leaving a place in better shape than when you arrived.  As a great student teacher, I reorganized my host teacher's kiln room, throwing center, and organized glazes and slips by firing cones.  I haven't been back to my host teacher's room since I left after graduation so I'm not sure if what I did was maintained, but I like to think it was.  If anything, the experience in working with a difficult space helped give me develop the skills I so highly value and incorporate in my teaching life regularly.

Sharing a room can also add to the difficulty of maximizing the space.  The teacher or teachers you're sharing a room with all have a different teaching styles, different needs, and different supplies.  My first teaching job was a .6 position just outside Detroit and I shared my room with the Mandarin teacher.  She was a very nice woman, but the urban teaching environment was very difficult for her to manage and there were a lot of cultural misunderstandings too.  Because she taught two classes in the morning, I taught three classes in the afternoon all of which were back to back, allowing us 5 minutes to change the room from a Mandarin classroom to an art room, we had a lot of problems.  The second year I was teaching at this school I was given a room to myself, which allowed me to make it an art room and focus on the space I needed for efficient flow and creating a good work environment. My teaching subsequently improved because I wasn't fighting my layout.
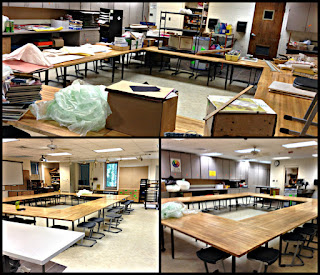
My second teaching location was in a K-4 elementary art room just outside of Grand Rapids.  At this
school I was a .3 art teacher and shared the room with two other art teachers.  It was nice to have an actual art room this time, but there were some difficulties in managing the space.  After my day and a half of teaching was complete for the week, I had to tear down my expectations, artwork examples, and make sure my students had left supplies in the order they were found.  It was a lot of extra work to put up and tear down your room in a matter of 48 hours.  I really streamlined what I needed the students to see. One of the teachers I worked with was very organized and particular about how clean the room was and the other was much more messy and cumbersome with supplies.  There were days I came to work only to find a mess left in the sink or all over the counter with the drying rack full which only added to my morning workload of preparation.  Needless to say I survived, even when the construction paper package was partially opened (a huge pet peeve of mine), I survived and established my own routines with what I was given with my room layout.  Teachers are great at making do with what they have.

Now I'm still in the same district but I moved buildings.  I'm now a .7 art teacher in another K-4 elementary school and have my entire classroom to myself.  It's a gorgeous room, with some large, gallery style track lighting on one wall, a large kiln room with ample cabinet storage, a paper storage room, and lots of cabinets.  I do wish there was more flat storage built in but overall that is just a small problem that can eventually be fixed.

Random things found in the storage room.
If you have ever had to move to a new building or even a new classroom within your building, its a lot of work.  Its even more work when you have one week to do it and the room you're inheriting is from your messy and cumbersome peer who spent 30 years in that room.  I should have taken more pictures of the room before I started making changes and cleaning, but there was that gut reaction of panic to start right away and not miss a moment as school was starting seven days from when I got the keys to my room. But to paint the picture of how much stuff was in this room, the retired art teacher took between one and three pickup truck loads of stuff to her house daily the whole month of June,  two to four loads of trash to the dumpster each day, and even had to rent a 10' x 20' storage unit for the stuff that didn't fit in her house. I even helped one day in June and took a few books of her hands and there was still so much stuff.

I'm still organizing and labeling things.  Sometimes I catch myself grouping like items in one cabinet only to finish and then decide they need to be moved over one cabinet more.  My room and I are still trying to figure one another out.  My computer and teacher zone are a constant mess because of the way the technology requires my desk and I am still mulling over my student table arrangement decision.  The more time I spend in my room, the more I am able to pinpoint what I need to fix.  Which, when you've been in your classroom for 10 hours and every counter space is filled with paper and miscellaneous supplies, that overwhelming feeling creeps up on you and you can't focus beyond the need to get the basics taken care of.

The supply closets & Ben sorting paper.
For me, the basics were to organize my dry goods (what I call my paper storage and dry art materials like crayons and colored pencils), go through my paint and organize it, establish a free choice/time area, create easy artwork storage, and an area to turn in artwork.  I'll admit, there were times I came home in those seven days and cried.  I cried because of the amount of cleaning and organizing I had to do and I cried because I was missing my old building with my teaching peers.  My mom and step-dad came up one day and helped me setup my tables, bulletin boards, posters, and even organized supplies. I had a fellow art teacher friend from college stop by and take a few things off my hands.  It was amazing some of the things we found in there.  As you can see by some of the pictures, it was an interesting endeavor. Ben spent several nights with me sorting paper and grouping like items.  He wasn't keen on doing such tedious tasks as sorting paper by color, shape, and size, but he did it for me anyway.  Ben thinks I'm a bit neurotic about those things and that they really don't matter, but for me I need to have it done to think clearly. It was good quality time together talking and listening to jazz as we sipped smoothies.

Overall, I've made it through twelve weeks of classes with everything rolling pretty smoothly.  My room still has some areas that ail me but I keep looking for solutions.  What I'm happy to announce is that I'm still keeping to my code even in my new, larger room, with vintage goodies.  Layout is important and something I'm always questioning and reflecting on.  I hope you enjoy some of my before and after photos of my room.

Happy dabbling.

Sunday, November 1, 2015

Catch Up Day

I have been very preoccupied the last few months.  My last post was ages ago and did not involve much of about art education as I glossed over a quick visit to Detroit and family raku firing in the backyard.  So many things changed this summer that I have just now started to swim instead of tread water.

This weekend was my first weekend off in a very, very long time and I have truly been playing catch up.  Since July, I have done required wedding planning with my mom (apparently she doesn't find my procrastination productive), thrown together a last minute bachelorette party (long story), attended various family gatherings including a meeting of 'The Parents' and a grandmother's 85th birthday, taught a two week ceramic course to middle school students in the middle of a Michigan Forest, bottle fed and raised two abandoned kittens, moved to a different building in my district, cleaned out and prepared my room seven days before school started, did some major house projects, created and presented two professional development sessions at the state art teacher conference, and then spent some time in Texas getting my good friend married.

Now, this was just the big stuff that happened.  I have completely by passed all the little things that absorbed my weeknights till the wee hours of the morning. You're probably reading this and thinking, "Sounds like a normal Tuesday" but for me, its been a few years, really college since I have had this many working hours and on the least amount of sleep possible.  The nice thing about being this busy is that I appreciate my partner and life even more than before and it gets my creative juices flowing.  I have finally had the burst of creative thought I needed to start writing and illustrating my children's book.


So since today is my first day off in about three and a half months, I'm using it as my 'Catch Up Day', which is a technique that I use with my students in my classroom. I think scheduling a catch up day is an important skill to teach children.  Taking the time to reflect and realize you need some time to focus on projects or tasks that are unfinished I think makes them more independent.  I share stories with my students about how I schedule a 'Catch Up Day' for my own artwork and sometimes even life in general. It's good for them to see that going back to a project that isn't finished isn't going backward, it's revisiting those skills we learned and reaffirm our ability to use them.  Plus, lots of students need to develop some grit and the ability to stick with something even if they aren't good at or like it. The students are always enthusiastic about a 'Catch Up Day' because they think I say 'Ketchup'.  I am thinking about making a cute ketchup bottle that says 'Catch Up Day' like I'm sure you've seen on Pinterest.

One of the most challenging things I've found teaching elementary art is managing those students
who do not complete their work on the day that I plan for them.  When you teach over four hundred students, managing the coursework can be difficult.  How do you organize student's work between four sections of one grade level? What happens when one student works consistently slower than the rest of the class because of a learning challenge, extreme focus, or absences?  This is probably the biggest problem I struggled with last year, my first year teaching elementary art. So since moving to a new building and having my room to myself, once again, I made it one of my top priorities to be more diligent with keeping students up to date on projects.

I think I'm a pretty organized person, and teacher overall, however we all have our shortcomings and this was one of mine.  I created several methods of helping the students manage their own artwork and for me to have small check points to ensure they are completing their assignments.

Like when I taught middle school, I created a Turn-In Center for my elementary students.  This is where I have students turn in work and fill out self assessment sheets.  I have two plastic Steralite drawer containers that can hold 18" x 24" paper.  One of the drawers is labeled 'All Done' and the second drawer is labeled 'In Progress'.  At the end of the class period when artwork was to be completed, students place their completed projects in the 'All Done' drawer and those that did not finish put their work in the 'In Progress' drawer.  At the end of the day, I go through and sort out the classes, a little more work than some would be willing to do, but it helps me take note of who is finishing their work and who is not. I place the completed work into a class folder. The class folder holds a manila folder for each student.  We use the manila folder as a portfolio for each student's finished work.  At different times throughout the year, I'll have students pass work back with the portfolios and we put all completed work inside there. This keeps me organized for when the annual art show comes along and students have to pick out artwork and write an artist statement with parent volunteers.


Middle School Turn-in-Center bulletin board.
When we are working on projects that take two or three days and are 2-D, I store the work in construction paper folders that correspond to the table colors for quick work of passing out artwork.  I take those pieces that were placed in the 'In-Progress' drawer and review them.  I make note of who didn't finish and why, looking for any correlation from previous assignments.  Then, these works are placed in the class drawer where the table folders and portfolios are stored.  They are kept separate from completed pieces.  When I start to see there is a lot of unfinished work, I schedule a 'Catch Up Day' for the class or classes that needed it.  Those students who are finished with all their assignments are given a small art project that they can take home with them such as origami, making a tetrahedron, or even small weaving assignments.

Middle School Turn in Center table.
The images pictured here are of my current turn in system, as well as the turn in system I used when I taught middle school art.  I think these are both good starting spots for anyone who is challenged by late work and gathering completed assignments.  If anything, I hope it gets you thinking about how you organize your completed projects and handle unfinished ones as well.  Now onward to my own very long list of 'Catch Up Day' projects.

Happy Dabbling.


Tuesday, July 21, 2015

Just Another Jam Packed Weekend

I don't know what happened to the rest of spring and summer this year.  Time has flown by so fast and I have had very little time to document my projects.  Between wrapping up my classroom, community art projects with students, family events, and friends getting married, I think Ben and I have had three weekends where we were able to just relax since the beginning of March.  And by relax I mean sleep in an hour and a half extra and do lots of house and yard work.  The homeowner's to do list is never done.

This  past weekend was no different from the last six we've had.  I was thoroughly impressed with all of the things we were able to squeeze in from Friday to Sunday.  One of Ben's fraternal brothers got married at the Henry Ford Museum in Dearborn, just out side Detroit.  Ben's grandparents and a few aunts and uncles live Downriver so we used this evening wedding to spend some time with the family.

We spent Friday night and Saturday morning with family.  Early Saturday afternoon we ran to pick up a new suit jacket for Ben (We currently have a case of the missing suit jacket going on).  The gentleman at Men's Wearhouse helped us find a jacket in the first five minutes we were there.  Great service.  The man did  panic a bit when we told him the wedding was in six hours, but he helped get us in and out.  And with a jacket that is much better than the one Ben had before.

Since we were spending the weekend just on the outskirts of Detroit, I had asked Ben if he wouldn't have minded if we  went to Campus Martius so I could see the Shephard Fairey mural on the old Compuware building. As we use to live in the Greater Detroit Area and Ben had previously worked for Compuware, we were pretty comfortable heading down there on a whim. However, we didn't realize how much construction is going on down there.  It was a complete maze.  Plus the Tiger's were playing at seven, so there was even more people and traffic.  We parked and walked in and around the old Compuware building.  Sadly the library was closed but we were able to see the commissioned mural.

After walking downtown for a bit, we headed to the Hard Rock Cafe for a few drinks with friends who were in town for the game.  It was a great, spontaneous, last minute meeting but worth the the laughter and joy we got to share.

From the Hard Rock we traveled to our hotel in Dearborn, showered, made sure we were pretty, and then headed to the Henry Ford Museum.  If you've never been to the Henry Ford Museum, it is definitely worth the trip.  This was our second time, first for a wedding here, but fun all the same.

The wedding was beautiful,short and sweet, allowing us a lot of time to wander through the museum, which was closed down, except for the wedding guests.  It was a bit eerie going through the exhibitions alone, with few if anyone else near you.  We definitely got to see things up close and take pictures we probably wouldn't have been able to take if there was a full museum.  Ben and I spent time looking at the trains, wandering through the car court where the cocktail hour was held.  Most of our time was spent in the plane exhibit and taking fun and random pictures.

Dinner was an amazing multi-course meal with great flavor.  One of the meats served was a petite filet mignon, each piece was cooked to a perfect medium rare and was extremely tender and juicy. The groom's sister made the cupcakes that were served for dessert.  There were several different flavors served.  Each cupcake however came with a cute chocolate car and a amazing sugar flowers. After dinner there was tons of dancing (the DJ was really good and played the saxophone and keytar throughout the night), drinking, and of course more trips through the museum. Ben and I made a little pit stop at the museum photo booth and took some quirky photos.  Truth be told, we need the practice and making the images amusing.

The night ended for us at about one in the morning.  We wished the newly weds well and then headed to the hotel where we both felt fast asleep.  In the morning, we showered and packed up, checking out before 11 and then headed to my parent's house.  My parents watch our dog Max fequently and we had to pick him up.  In addition to picking up Max, I had scheduled a raku firing in the backyard with my Step Dad. In about eight days I'll be at an art camp for almost two weeks and I'll be firing hundreds of student made pieces, so I wanted to review the process, practice, and get my examples done before camp.  You can read more about raku in this little blurb on Ceramic Arts Daily.

If you've never rakued before, it is a really fun process.  It has never been part of my firing process for my ceramic work but I love participating because of the quick process and the fire.  I mean honestly, who doesn't like playing with fire? After glazing and gathering all our supplies we spent about four hours firing total.  This was the first time I had fired the trash can kiln, which is a bit smaller than the one I fired a few years ago.  Because of it's size and the warnings about heavy weather, we tried to push the kiln a bit to much and had it in a more reduced atmosphere.  This caused all my glazes to look the same, especially the blue/green ones.  Besides the glazes, we only had two fatalities in the kiln and that's because of the shape and construction method.  Ben decided he wanted to help pull pieces and burp the trash can.  He really enjoyed helping as you can see from the picture.

Most of the pieces fired are going to be stacked to create a totem.  I'm hoping the campers love this project and will be able to create a totem that is about two feet tall with different textures and forms through darting and manipulating the clay while handbuilding.  I look forward to posting images of the student work soon.

Happy dabbling.

Thursday, July 9, 2015

Spring: A Moment to Restore Order

In college I had a college professor who had taught K-12 art longer than I had been alive.  She'd been teaching at the university for almost a decade when I took her class.  Judy was one of the most quietly influential instructors I've had the pleasure of learning from.  We've all had those instructors or influential people in our lives where just about everything they say has a loud, audacious, and immediate impact on our life.  Those people with such intelligence and authority that they tell you something and it makes you stop in your tracks and think, 'why the hell did I not know that?'.  Judy was not like that. I describe her influences as quiet because she was making an impact on me much before I even realized it.  Every so often I'll be working in my room, teaching a lesson, or sharing my experience with a colleague and I'll stop and realize I'm speaking Judy.

Muddy Buddies with Jen Allen at the Grand River Brewery.
Judy aged with such grace, that I can only hope one day, when I have wrinkles as deep as the pot holes of Michigan across my face, that I will look as attractive as her.  Her voice was sweet and soft and she always spoke in a conversational manner.  As feminine as her voice lilted, she had an almost baritone rasp at the ends of her words that emphasized her less than ladylike language.  When Judy would get on her soap box about art and education she would always let a few choice words fly but in contrast to her voice you always had to second guess what your ears actually heard.

Of all the things that Judy had said the one that I remember moving something inside me during the lecture was, "It's hard to balance being an art teacher and an artist.  My students always knew when I hadn't made my own art for awhile.  They would say, Mrs. Thurston, you need to make some art because you're grouchy.  So don't forget to take some time and work on those things that you need to in order to restore your creative soul."  I can pinpoint the exact days where I have been teaching a lesson and I could feel that surly, mundane mood upon me in the classroom.  Thanks to Judy,  I know that when I have that feeling, I go home and I make art.  If I can't use clay because of the weather, I draw, when I discover I'm out of charcoal, I sew; I stop the school work as soon as I leave the building and I listen to my creative desire so that I can recharge.  Papers can wait to be graded, lesson plans can wait to be written, but the excitement and passion you need to engage your students can't wait.  I firmly believe that my passion and personal creativity is what keeps my students so enthralled with projects and my lectures, without it I wouldn't be as effective, and so I take the time to restore order to my creative soul.  Having almost completed my third year of teaching, I am much better at halting my work to allow my batteries to recharge.  As a first year I worked myself to exhaustion and made very little art that year.

Jen working in the museum with a great setup.
It has been a while since I have made thrown work.  We bought the house in July, moved, I taught four full weeks of summer art classes that were in different parts of the state, and I got a new job.  By the time fall and winter arrived, I was exhausted but just finding my rhythm, however the turning of the weather prevented me from using clay.  My garage, which will soon be transformed into my studio, isn't insulated allowing me and my work to freeze. So my hands and creative energies have been away from dirt for just about 7 months, and I was becoming quite the grump in the classroom, when I decided I needed to recharge and get inspired in the ceramic realm.  A few friends and I attended the Three Days of Clay in Jackson, Michigan hosted by the Jackson Pottery and Clay Guild (JPCG).  This was just what my creative side needed.


I highly recommend attending this annual event held by JPCG.  I have been to Wooster for their Functional Clay Workshop, which I loved, and I have been to NCECA which has its ups and downs.  But for the price and level of commitment the guild members put into this workshop, I fell in love.  I am always skeptical of guilds.  I have encountered several guilds where they were more about their own self-promotion and less about helping one another and learning. I have attended guild functions where I was purposely made to feel secluded and isolated by the members.  Now there are some fantastic guilds out there I am sure, it appears it just takes me longer to meet them.  The JPCG is definitely the supportive learning community that I always imagined a guild should be.  As part of their Three Days of Clay Workshop, they hold a raffle for donated ceramic items and put the money towards local schools who are losing their ceramic programs because of funding cuts.  They made it clear that they were accepting of all skill levels and could make accommodations to include those who lived outside the greater Jackson area. All of the office holders, and general members of the guild that I spoke to were encouraging and were delightful to have a conversation with.  Jackson has a special community at the Ella Sharpe Museum of Art and History.

Jen's work in various stages. Photo Credit: Cathy McKenna
This year, the guild's presenter was Jennifer Allen, a functional potter with her hands deep in family, teaching, and surface design.  I learned a lot from Jen as she threw forms, demonstrated alterations, and her layering process for design. She is a wonderfully, laid back and entertaining demonstrator. To the right you can see some finished work she brought to sell, bisqued and decorated examples, as well as wet work that was auctioned off by the guild.  I am always eager to watch another artist who works in layers to achieve a decorated surface.  When working on my own work, I often wonder if I am using my layering practices to the best of their ability, so it is nice when I can cross reference and watch someone like Jen Allen work through their process.

My mug from the Mug Exchange.
In addition to two solid days of demos, there was an evening lecture of Jen's artistic process and inspirations, and a fun little meet and greet. On the second night, the JPCG held a mug exchange at the Grand River Brewery.  The brewery was an amazing place. It had a bit of a steampunk feel with some of the antiques and metal sculptures that were located throughout the large open room.  The JPCG had a party room, the only room separated from the main brewery floor by two walls with glass windows the entire length of the room.  Inside we set our mugs on a table and picked a place to start conversations with other ceramic enthusiasts.  After a short while, when all the mugs had been placed, we were able to look through them and take a mug that we did not bring.  It was interesting to see all the different styles of mugs people were working with.  I should have taken a picture of all of the mugs on the table but didn't think to.  The mug I chose was handbuilt with all this interesting texture and pattern done on a white clay body with what looks like a black oxide along with a maroon, dark green, black and clear glaze.  I usually am a stickler for picking mugs that appeal to me based on the handle comfort level and appearance, but this mug made me go against that.  I loved the surface of the mug so much that the rounded, extruded handle didn't bother me.  It isn't the most comfortable handmade mug I own, but no matter how many times I use it, I catch myself re-exploring the details.  I seem to always find something new to focus on which makes me extremely happy.

Jane and I enjoying the food, beer, and ambiance at the brewery.
The beer and food at the brewery was great.  I had their Cherry Poppin's Cherry Wheat beer.  I am a complete sucker for Montmorency cherries which it was brewed with.  This was a tasty, fairly light beer that wasn't too sweet like some fruit beers I have had previously.  The cherry taste was there but not overly strong, almost subtly.  To accompany the beer I chose to split the Bavarian Pretzels with friends.  These soft, extra fluffy pretzel sticks were delicious and came with a spicy cream ale mustard sauce.  The tang of the mustard was toned down by the ale's deep flavor.  It was not hot spicy, but more like a fresh mustard spicy that demanded attention.  As my meal, I chose the pierogi's with potato and cheese served on top of warmed sauerkraut and cooked onions with a delightful drizzle of creme fraiche; I was elated to see pierogi's on the menu as I grew up having my grandmother make them for family gatherings.  The dish was comforting with the warm kraut and dough of the pierogi but the creme fraiche created a lightness to the meal I hadn't been expecting.
 The meal made for a great conversation at our table as well as the ongoing workshop.

This is definitely a workshop that I plan to attend again and would recommend it to any Michigan or nearby Midwest ceramic artist.  When I attend a workshop my goal is to always leave feelings that my art educator self and my artist self gained new knowledge and gave back to those around me.  The Three Days of Clay workshop is one of the first conferences in a long time where I felt I gave as much as I took away, inspiring me to add new elements to my work and putting a fresh spring in my step.  Upon returning to my classroom, my irritable mood had left me, and I once again felt the calm and uplifting atmosphere I make my room to be.  My students seemed to be pleased with the fresher, Miss D who returned from a weekend of art.

Happy dabbling.

Saturday, February 28, 2015

Oh the Things You Can Find in an Old Art Room

A painted teacher smock.
I have been teaching for three years now and have had two different art rooms, one for each of the districts I've taught in.  I have worked closely with other art teachers in my district and viewed their storage rooms and stock piles from previous art teachers. It always amazes me at the types of treasures that can be found. 

As art teachers, I feel like we tend to suffer from hoarding.  I know I am guilty of this.  Anytime Ben is about to recycle or throw something away such as yogurt containers, cereal boxes, and egg cartons, he always comes to me first and asks if I need it.  This makes me both happy and sad at the same time.  I'm ecstatic that Ben has realized that as an artist and art teacher, I see potential from typical garbage and have a desire to give it a new purpose.  But at the same time, I'm saddened by this because sometimes I collect things for months and won't use them for a few more months or even years if at all.  So all the things I collect get stored until my brilliant ideas become a reality and I can use them in or to teach a lesson. The storage facility is either my garage, which leads to unhappy Ben, or the limited space of my shared art room. I have an art teacher friend who made a pledge for herself to not collect garbage and spend the money for actual paint palettes and water cups so there was a uniformed and cleanly look to her room.  I have started to try and be more purposeful in my collections but am still working on it. My collections don't just stop at potential waste products.  I accept donations from parents and businesses such as five cases of old school printing paper with the little tearaway edges and perforated page breaks as well as fabric samples, yarn, toys, and the list goes on and on.

Urine Specimen Kits and FedEx shipping bags.
I continue to accept freebie items because I'm always worried about my budget.  Drawing paper is expensive, paint is expensive, Sharpie markers are expensive and if there is anything I can do to stretch my budget a little farther, I'm all for it, hence the significant amount of donated and collected items.  The fear of running out of supplies for a project is very real for me.  At my previous school district I had very little wiggle room in my budget; try getting enough art supplies for 200 students for a full year of art for $250. It was extremely difficult to manage but I had alternative material lessons and my students got a strong understanding of mixed media as we tried to stretch our supplies as far as they could go.

In addition to holding on to a collection of non-traditional art supplies, I, as well as many of my colleagues, have a tight grip on supplies the previous art teacher purchased even if they're from the 1950's.  After I graduated high school, one of my dear friends who was years ahead of me took the position of our old art teacher, who had just retired.  I remember hearing the horror stories of the products she found such as powdered paint mixes, glazes with lead, and adhesives that were quite questionable.  She informed me, for my future art room cleanings, that she had to call and have a lot of the materials properly disposed of as to not contaminate the classroom or landfills.  Some of the pictures she shared of these products made me sad to throw them out.  The containers and typography were gorgeous as long as you forgot about the carcinogenic poison inside. 


I still have no understanding of this thing's purpose.
I have not experienced the same caliber of inherited ancient art supplies like my friend, but I have found some pretty cool things, as well as tools that I have no idea what they were ever used for.  For example, a new kindergarten teacher was hired in my old school district the year before I left and she gave me a bunch of stuff that was from the arts and craft center.  Smiling and being overly gracious I took it all, all the boxes of sponge stamps, cheap brushes, scraps of paper, and stencils to my room for sorting.  I always figure if it is free and I can't find a use for it, I'll pitching it or donating it after I look through it.  It's no skin off my back to help another person find their treasure from my trash, especially if I find something for my room.  Inside one of the many boxes I took were tons of these weird plastic, rubber lid things.  I have Google'd this item and have yet to find something remotely similar, so I have no idea what it's purpose is.  But these strange four inch circles  housed a two inch tall rubber cone that sat inside the lid.  At the top of this cone was an opening, much like that of the tips for a pipping bag in a bakery.  The only thing I could come up with was it was actually a lid that fit very specific size of paint jars that were being used; the opening in the cone helped keep brushes from getting lost in the jar.  If anyone has an answer to this, I would greatly appreciate knowing the function of this tool. I found a whole another box in my new school's storage room and am still perplexed everyday that I walk by them.

My second find was a beautiful tempra paint bottle from Binney and Smith, the company that made Crayola Crayons.  This was so beautiful that I took it and it lives in my studio. Every time I look at it, it reminds me that there was a time where the care in presentation and packaging coincided with function. The curves on this rubbery, plastic paint bottle and the nozzle for releasing paint are absolutely perfect. I wish I had a set to use in the classroom, it would make paint dispensing much easier. 


Tempra paint bottle and Friendly Plastic.
Another find that I had to share with an old ceramic professor of mine was the Friendly Plastic by Amaco.  This thing is absolutely insane.  No matter what I did or how closely I followed the directions, I just couldn't get this stuff to work. In case you don't know what Friendly Plastic is, it is a bunch of 3"x 1" sticks of colored plastic that you are supposed to be able to melt to a mold-able consistency with warm water. Judging by the jewelry and fashion styles in this instructional pamphlet that came in the container this jar was produced somewhere between the mid 80s to early 90s.  Amaco still makes Friendly Plastic in stick and pellet forms.  I have not tried the newer stuff, which I imagine work better than the 25 year old plastic I have but I couldn't resist trying my free old stuff.  My favorite part of the instructions is the caution statement; it reads "Caution: Friendly Plastic will soften or melt at approximately 100*F (38*C).  DO NOT expose sticks or finished pieces to direct sunlight or areas of concentrated heat such as in a closed car."  Reading this always makes me smile as I wonder how many people actually lost their jewelry to a sunny day at the beach or in the cup holder of their car.  After trying this at home, I definitely decided I couldn't use this with my middle school art students and that there was no use keeping it in my classroom.  It soon after fell into my collection of ancient art materials.


The tabletop printing press & my silly trial.
The most recent of my finds was in my new classroom.  I've been teaching in my new district for about five months as we're about half way through the school year. I moved a box while cleaning out a small section of my storage room and behind that box was a small collection of silk screens.  For an elementary art room, I was super stoked to have these.  The high school art rooms that I had been at previous didn't have screens for printing.  As I was coming off my giddy art teacher high from my new discovery, I realized that the box I made moved was a table top printing press.  I had to stop what I was doing and print something right then.  It works but needs a little bit of help getting the bed to run through smoothly, but I definitely think it will make printmaking more exciting for my students.  Not only a I super stoked for the press, but the box still had the original instructions and a small container of questionable, crystallized amber contents.  This has just become one of my new toys to play with on summer vacation.  

All in all, I think being an art teacher is a great job! Budget's and questionable materials at aside, what other job lets you feel like Indiana Jones?  I mean, you collect ancient supplies, dangerously dig under piles of stuff in your storage room (those rolling stone balls are not just hidden in primitive caves, they exist in your art storage so beware), and all the kids swoon over your cool demeanor. As long as I teach, I will continue to be a bit of a supply hoarder and I will still keep a collection of weird, old materials, nothing will change that.  However, I do promise to keep it under control as much as possible. 

Happy dabbling. 

Thursday, February 5, 2015

Optical Illusions for Elementary

One of my favorite parts of being an Elementary Art Teacher is the excitement and joy the students have when they come into my classroom.  I feel like a mini-celebrity. Now don't get me wrong, not every kid loves coming into my classroom; I have those students who choose to do the opposite of what I suggest, cry when they make a mistake, or just use the time to socialize.  But the majority of my day is filled with students who show the desire to make and learn from me, which has been a new experience coming from an urban middle school.

Sometimes when coming up with ideas for projects and different ways to teach a concept, I purposely look for the hook.  How can I get the students excited for the project? Seeing their reaction to new materials, mediums, and skills just doesn't seem to ever get old.  It definitely keeps the repetition of teaching the same lesson several times a day interesting for me.

I decided to challenge my third and fourth grade students with a project that I did with my sixth graders the year before.  When comparing my elementary students at my new school with my middle school students at the old school, I would say that the elementary students are just as advanced as most of the sixth and seventh graders I taught in regards to their ability to follow directions, create interesting ideas, making connections to subject matter outside the art room, and a good portion of their motor skills. This new project was to create an optical illusion.

The optical illusion project was an assignment that one of my pre-internship teachers, Brenda, taught her students while I was teaching with her.  It was an easy project with several steps, combining basic skills the students learned over the course of their few weeks in her class such as composition, value, color blending, and using a ruler.

Having just finished this lesson, I've been doing some heavy reflection.  My 3rd and 4th grade students have been more successful than my 6th and 7th grade students in some ways and in others have been lower on the totem pole of success.  This project took much longer than I had anticipated partly because they were stuck on their rough draft idea and partly because I only have them for an hour once as week so by the time they build up momentum, it's time to clean up.  There were minimum tears when strips of paper got lost or someone glued their piece upside down, but the students and I both survived and made some pretty nice art in the process.

The optical illusions are now hanging in the hallway in preparation for conferences this week.  As cool as these pieces of art are, they are difficult to photograph and attach to bulletin boards.  I found myself having to use multiple staples in each piece of art, mainly stapling in the fold creases to try and keep them as accordion shaped as possible.  Hopefully these images will give you an idea of how they look in person.

Happy dabbling.

Title: Optical Illusions
Grade: 3-4                Class Periods: 3- 60 minute Class

Elements of Design: Form, Color, and Texture
Principles of Design: Emphasis, Movement, and Contrast

Materials & Resources:
Previous student work                                                    Teacher demonstration/work Images/books on optical illusions                                   Rough Draft Paper                    
White Drawing Paper 10" x 8"                                        Misc. Paper 8" x 20"
Crayons                                                                             Rulers
Glue                                                                                   Scissors
Pencils

Objectives: 

  • The student is able to describe and identify an optical illusion. 
  • The student can create an optical illusion by utilizing cutting and folding skills.
  • The student is able to measure accurately with a ruler, draw and cut straight lines.
Learning Activities:  3 Day Project

Day 1:
  1. Show and discuss optical illusions.  Introduce the project by showing examples and give an overall demonstration of the creation process.
  2. Students  should begin to come up with ideas for their optical illusion.  I like to have students choose either two objects that go together like peanut butter and jelly or two objects that don't go together like a dog and a cat.  Have the students practice drawing their object or subject matter.
  3. After the final draft is complete, have the students draw their final draft.  Each object/subject they chose gets its own piece of 8" x 10" white drawing paper.  For example the dog would be drawn on one piece of paper and the cat would be drawn on the second piece of paper.  Discussing composition in regards to negative and positive space is helpful to get the students to fill the paper 
  4. After students have started the drawing of their final draft, demonstrate value application and blending of crayons to enhance the visual interest of their artwork. 
  5. Allow the students to begin applying value to their artwork. 
Day 2:
  1. Review information about Optical Illusions, value, composition (negative/positive space).
  2. Allow students some time to finish the color application part of their assignment.  
  3. As students get closer and closer to finishing the color application portion start demonstrating how to use a ruler. Show the students how to measure one inch marks at the top of their drawing and the bottom.  Connect the top and bottom notch to create a straight vertical line that breaks the drawing into one inch strips of paper.  Have students do this on the back of their drawings as it won't damage their art if they make a mistake. 
  4. Have students label one picture A and one B with each strip getting a number after the letter.  For example, picture A would have strips labeled as A1, A2, A3 and so forth. This helps identify missing or unidentifiable pieces.
Day 3: 
  1. Review Optical illusions, how to use a ruler accurately, and demonstrate the next step of the assignment.  
  2. Have each student cut their two drawings into the one inch strips they measured  from the previous class. Put each picture back together like a puzzle so the drawing is facing up.  This eliminates pieces from getting glued upside down.
  3. Students should combine both drawings by alternating one inch strips.  An example of this would be A1, B1, A2, B2, A3, B3.  Do this until they reach the end of their pictures.  The strips should be glued next to each other not overlapping one another.
  4. Using the 8" x 20" sheet of paper, have students use just enough glue to attach each strip in the order above to the paper.  Too much glue will result in a super stiff piece of art and the students will not be able to fold the artwork when the glue dries.
  5. It is best to fold the artwork when the glue has dried a bit but you don't have to. Have students do an accordion or fan fold in between each strip.
Assessment:

4.0 - The student understands and can make an optical illusion by using a ruler and value without help. They can help another student or teach a friend.
3.0- The student understands and can make an optical illusion by using a ruler and value with minimal help from the teacher. 
2.0- The student needs help from the teacher to make an optical illusion by using a ruler and value. The student needs assistance when identifying and describing an optical illusion.  
1.0- The student is dependent on help from the teacher to complete an optical illusion by using a ruler and valueThe student needs assistance when identifying and describing an optical illusion.   
0.0-  The student is unable to create an optical illusion by using a ruler and value even with a teacher's help.  The student does not understand nor can they identify and describe an optical illusion.

Thursday, January 8, 2015

A New Year Means A Clean Start

Happy New  Year!  I can't believe it is 2015 already.  It's a clique to say but I can't help but feel it's true; time flies, especially is you're having fun!  Reflection is a big part of my artistic and educational pedagogy.  I spend much of my time reflecting in my daily tasks.  When a task takes a lot of repetition like cleaning and cutting vegetables, I feel my mind go to what I can best describe as a meditative state, much like when I throw pots.  It's in this state that I do my best think: about life, my career, my artwork, and the world around me. 

I'm still reflecting on 2014, a lot of good things happened in the beginning of the year but it didn't end as positively as I had imagined.  The holidays were strewn with several deaths and illnesses of close friends and family and the stress of being a part-time art teacher and artist started to weigh heavily on me.  Stress tends to make me cleaning and organizing, as if the physical ability to clean and organize chaos helps me clean and organize my emotions, thoughts, and demands.  The other nice part of cleaning and organizing is the accomplished feeling of starting fresh.  I don't think there is ever quite as good of a sleep as going to bed the first night of making the bed in clean linens. A new semester or school year is always fresh with the feeling of anything is possible.  

Keeping my house and my classroom clean and organized are a way I help keep my stress levels low.  I have been accused of being a "clean art teacher"; I'm not sure if that is good or bad but it seems to hold true when I reflect on my daily teachings.  One thing I let get out of hand is glue bottles.  

It seems a majority of the art teachers that I have run into lately are obsessed with glue sponges.  They have their plastic lidded containers with a sponge filled with glue inside.  This, I do say, is a really cool idea and I love it for certain projects, but I just can't seem to drop the use of glue bottles completely. I think learning how to use a glue bottle appropriately is an important skill even if it seems a bit passé. Through the few years of teaching experience I have had, I have developed a stream line way to clean and fill the glue bottles so it doesn't eat up a bunch of my time.  I even learned a new trick from one of my fellow second grade teachers while cleaning this semester's glue bottles.  

Glue Bottle Cleaning Procedure

  1. Get a microwaveable safe bowl.   
  2. Line up your glue bottles and remove all the caps.  Place each cap in the open position in the microwaveable safe bowl.  
  3. Wipe down each uncapped glue bottle to remove buildup, especially near that top.
  4. After all the caps are open and removed, fill the bowl with water.  
  5. Microwave the bowl filled with glue caps from 3-5 minutes.  I sometimes repeat this process several times, giving the caps a good swirl with a brush handle to agitate the glue clumps.
  6. Once the water in the bowl has cooled enough to handle, use a paper clip to remove any glue that did not dissolve in the hot water from the inside of the glue cap.
  7. Run water from a faucet in the glue cap to ensure it is clear.
  8. Fill all glue bottles going down the line.
  9. Cap each glue bottle and store in your usual location.
This whole process takes me alone about an hour.  If I don't have time to do it by myself, which let's face it, many of us teacher's don't, I'll have students come and help me.  They love fishing glue clumps out the caps.  I always fill the glue bottles myself because I don't want students accidentally spilling a gallon of glue all over my floor.  Having students help gives me the ability to multi-task and get a lot accomplished.  

To some people this may seem like a headache and not worth the time, but I believe the care I and the students exhibit to the glue bottles will make them last longer.  Plus, I hate having students come me during projects with glue bottles that need emergency de-gluing.  I would much rather make this part of my winter and summer cleaning so that my lessons run smoothly. 

The one trick that my second grade teacher shared was using Vaseline.  By putting a dab of Vaseline inside the the tapered part of the glue cap the cap doesn't clog.  Apparently the lubrication keeps the glue from sticking to the interior walls of the glue cap.  While talking about this in the lounge, another teacher said that she had read that if you soak the entire glue cap in vegetable oil it prevents the caps from clogging as well. After cleaning the glue caps before winter break I tried the Vaseline trick.  We've only been back in session for a few days now but I hope it works and will soon be part of my glue bottle cleaning ritual. 

Happy dabbling.